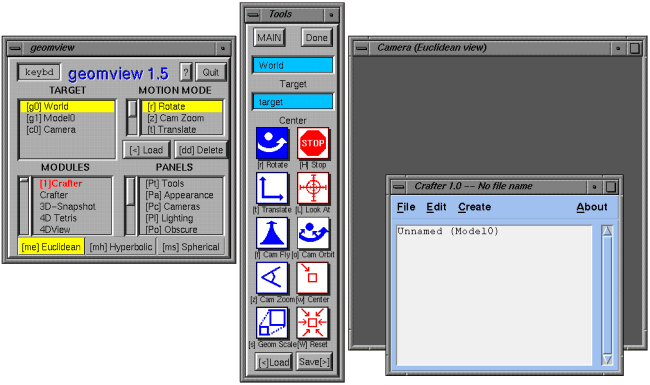

Geomview is used only to display the model and let you look at it from
different angles. Crafter windows handle all editing of the model.
3.2. Command line options
When starting Crafter, you can specify a file name on the command line.
For example, typing:
crafter voyager.cr
will load the file voyager.cr if it exists. Otherwise,
voyager.cr will be the name of the current file once you save it.
If more than one file name is given, then the first file is loaded
the normal way, and subsequent files are merged with the first one.
Other command line options available are:
crafter -c "SetProps Model0 {highlightsel 1}"Multiple commands may be specified by separating them with semicolons (;).
crafter -f startup.tclIn a file, commands may be separated by newlines or semicolons (;).
crafter -p mypipeCommands are read from the pipe /tmp/geomview/mypipe.
3.3. Overview of Geomview
Crafter is an external module to Geomview. That means that Geomview
starts Crafter as a separate process and communicates with Crafter
through standard input and standard output. Theoretically, the only
of Geomview's windows you need to be concerned with is the camera window.
However, knowing a little more about Geomview may help you understand
why things behave the way they do. It will also give you a better
understanding of how to customize Crafter.
The list of targets contains all the objects that Geomview currently knows about. When you are using Geomview with Crafter, the list should look like this:
Model0 is the entry for the Crafter model. Geomview treats the entire Crafter model as one object. World corresponds to all the currently loaded objects, treated as if they were one object. Camera refers to the camera window on the right. While using Crafter, it is safe just to keep World selected as the target object.[g0] World [g1] Model0 [c0] Camera
The other list is the list of External Modules. When using Crafter, this list should contain at most three lines. It should look something like the following:
The red line starting with a number in brackets represents the Crafter process running. Clicking on this entry kills the Crafter process. The other two lines allow you to restart Crafter. Be careful.Crafter [1]Crafter "voyager.cr" Crafter "voyager.cr"
Other common operations that do not change the motion mode are:
See the Geomview manual for more information about its features.
3.4. Basic Interaction: The Model Editor
Crafter's main window, the Model Editor,
displays the overall structure of the model and allows you to edit it.

3.4.1. Hierarchy list
The main part of the Model Editor is a scrolling list showing the
model's hierarchy. The topmost entry in the list contains the name of the
model. If it is a new model, this will be the only entry in the list.
Otherwise, each entry contains the name of a piece of the structure
followed by the type of piece it is. The indentation represents its
place in the hierarchy. The best way to understand this is with an example.
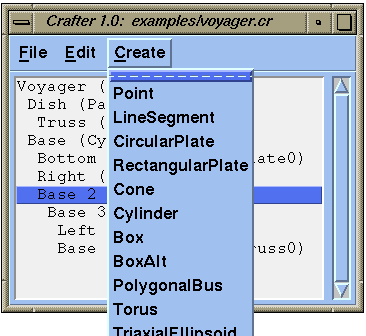
In the previous figure,
Voyager is the name of the model. Dish (a parabolic dish)
and Base (a cylinder) are at the top-most level of the model.
Truss is attached to Dish. Bottom cap,
Right and Base 2 are attached to Base.
And so on.
As you probably noticed, what's in parentheses after the name of the piece is not just the type, or class, of the piece, but also a number. Actually the thing in parentheses is the address of the piece. An address is a unique identifier for an object, assigned to the piece by Crafter, and may be different each time you run Crafter. It consists of the class name followed by a number with no spaces in between. The name of the piece, also called its long name, can be any string you want. It may contain spaces and does not need to be unique. The long name can be edited in the General Properties Panel described later.
3.4.1.1. Selection
Crafter allows you to select objects from this list for doing
editing operations. To select a single object, click on its entry in the
hierarchy list. To select multiple objects, drag the cursor over the region
of the list you want to select. If the items you want to select are not
contiguous in the list, press the control key along with the left mouse
button to add to the selection without first clearing the existing selection.
Another and perhaps easier way to select an object is to click the right mouse button over the object in the Geomview window. The piece of the model that is directly under the cursor will be selected in the hierarchy list.
Note that when the cursor is over a properties panel
(general or class-specific),
the current selection automatically changes to the object represented by the
panel.
3.4.2. Navigating in the hierarchy list
Navigating the hierarchy list is made easy with the arrow keys.
The up and down arrow keys move the selection up and down the list.
The left arrow moves the selection up in the list to the parent of
the currently selected object.
If more than one object is selected, then the topmost selected item is
considered to be the currently selected item while using the arrow keys.
In the previous example, Base 2 (Cylinder1) is selected. Pressing the left arrow key moves the selection to Base (Cylinder0)
Pressing <ENTER> in the Model Editor window is like
double-clicking on the current selection; it brings up the
General Properties Window (described later) for the currently selected
object(s).
3.4.3. File name
In the title bar of the Model Editor is the name of the current file being
edited.
If you save the model without specifying a new name, this is the name that
will be used.
3.4.4. Menus
Across the top of the window is a menu bar with menus for file operations,
edit operations and creating and attaching objects.
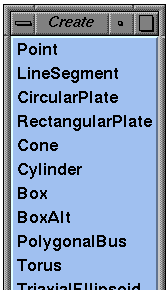
All menus can be torn off and posted
as separate windows. In a posted menu, the items are invoked simply by
clicking on them.
This is particularly useful for the Create menu, which allows you to
create and add objects to the model.
To tear off a menu, post the menu as you would normally, but instead of
selecting a menu item, select the dashed line at the top of the menu.
This creates a separate window of menu items that is available at all times.
 ->
->

3.5. Creating and attaching objects
The Create menu contains a palette of spacecraft pieces, or
primitives, that may be attached to the model. It may be useful
to tear off this menu if you are using it a lot.
To create and attach a new object, first you need to decide which existing object you want to attach it to, or if you want to make it a top-level object in the model. Select the parent object's entry from the hierarchy list in the Model Editor, or select the (Model0) entry if you want it to be at the top level of the model. Then from the Create menu, select the class of object you want to attach. A new object will appear in the model displayed in Geomview, a new entry will appear in the hierarchy list, and a window called the General Properties Panel will pop up. This panel controls properties such as scale, rotation, transformation and appearance.