
\array{ a & b \\
        c & d }
One of the biggest differences between WebTeX and LaTeX is how arrays are handled. The WebTeX arrays are much more closely related to MathML and HTML tables. In practical terms, this mostly affects the way in which array layout options can be changed, and the command syntax for doing so. At the same time, LaTeX users will also find many familiar features in WebTeX arrays.
The \array command may be used for creating a table of
any kind. A simple 2x2 array would be given by
| |
\array{ a & b \\
c & d }
|
&) is placed between entries
(called cells)
in each row, while rows are separated by a double backslash
(\\). Note that there is no & at the end of
each row and no \\ after the final row. Spaces and line
feeds are ignored by WebEQ; they are only used here to make the WebTeX
code easier to read. The expression
\array{a&b\\c&d}
is displayed the same way as the example above.
Arrays may be nested, as in the example
 |
\array{ \array{0&1 \\ 1&0} & A \\
                B         & \array{0&1 \\ 1&0}
      }
|
The first element of an array may be the command \arrayopts{}.
This command allows you some control over the layout of the matrix.
You may place one or more of the following commands within the braces
of \arrayopts{}:
Each column may be individually left justified, right justified, or
centered. The \collayout command justifies each column
according to the list of positions given in its argument. Type one of
left, center, or right
for each column, separated by spaces. Place solid or
dashed
where you would like to separate columns with a solid or dashed line.
Example: An array with three columns, the first flush left and the other two flush right, is given by
\array{ \arrayopts{\collayout{left solid right right}} a & b & c}
Note that there is a solid vertical line between the first and second
columns, but no line after the second column.
The tour of WebEQ includes an example of the alignment of columns within an array.
The whole array may be shifted vertically using the
\align{} option. The default is
\align{center}, which places the center of the array even
with the middle of the surrounding expression. Replace
center with top or
bottom to align the top row or the bottom row with the
surrounding text. A fourth possibility is to align the array at a certain
row. Type \align{r2} to align at the second row.
The Tour of WebEQ includes an example of the vertical alignment of arrays.
WebEQ inserts a small amount of space between entries in an array.
The \padding{} command adjust these gaps. The argument
may be any floating point number, including
negative numbers. The default is \padding{1}. An argument greater
than one spreads the cells, and a number less than one pushes them
closer together. Negative values may cause the array entries to
overlap.
The Tour of WebEQ includes an example which shows the effect of
using different values for the argument of \padding.
The command \equalrows{true} causes all the rows
of an array to be the same height. The corresponding
\equalcols{true} does the same for the width of all
columns. The default
for both options is false, which lets each row or column
be individually scaled to acommodate the entry with the largest height
or width.
The Tour of WebEQ includes an example
of the use of \equalrows and \equalcols.
The first element of each row of an array may be the command
\rowopts{}.
This command allows you some control over the alignment of the text in
each row and provides a way to insert horizontal lines between rows.
In contrast to the array option \align, placing this
option within the command \rowopts{}
controls the vertical position of each entry in the row.
The whole row is aligned vertically according to the option given.
The choices are top (the top of each entry is placed
flush with the top of the row), bottom (the bottom of
each entry sits on the bottom of the row), center (all
entries are centered) and base (all entries align on
their natural baselines).
The default is \rowopts{base}, in which the baseline of
all entries are matched.
The Tour of WebEQ includes an example of the alignment of rows.
A horizontal line just below the current row may be added with the command
\rowopts{\underline{solid}}. For a dashed line, replace
solid with dashed.
By default, there are no lines between the rows.
The Tour of WebEQ includes an example of underlining.
The command \cellopts{} may be placed at the beginning of
any cell with any combination of
the following options to adjust that individual cell.
These two options, \rowspan and
\colspan,
allow an entry in the matrix to cover two or more cells. For
example, \colspan could be used to create a heading for a
table which is centered over the two columns.
The argument of \rowspan is the number of rows including and below the
current row that will be covered by the cell.
Similarly, the argument of \colspan is the number of
columns including and to the left of the
current column that will be covered by the cell.
Note that the \rowspan and \columnspan options options merely control the number of rows and columns that a given cell can cover. They do not affect the contents of adjacent cells in the array. Thus, it is the responsibility of the author to make sure that the adjacent cells are empty. Otherwise the contents of the spanning cell and the adjacent cells may overlap. Another way to think of this is that, for example, a 3x3 array always contains nine cells, whether or not some of them span multiple rows and columns. If there are spanning cells, they are "controlled" from their top left corner cell (where the \rowspan and \colspan options are given), and they merely overlay the appropriate neighboring cells.
The Tour of WebEQ includes an example of the use of
\rowspan and \colspan.
The cell options \rowalign and
\colalign change the
vertical or horizontal placement of an entry within its cell, much the
same as the array option \collayout and the row option
\align, which work on whole columns or rows.
The \rowalign command changes the vertical alignment.
The expression in the current cell is placed at the top,
center,
or bottom of the row by using one of these words as the
argument of
\rowalign. The default is \rowalign{base},
which places the cell entry on the baseline.
Horizontal alignment is controlled by the
\colalign command,
which has the possible arguments left, center, or
right. The default is \colalign{center}.
The Tour of WebEQ includes an example of the alignment of array entries.
 |
A = \left ( \array{ a & b \\
                    c & d }
    \right )
|
\floatleft and
\floatright commands instead.
This example of a 3x2 matrix with its top row aligned with the equals
sign requires the use of \floatleft and
\floatright .

A = \floatleft ( \array{ \arrayopts{\align{top}}
                    a & b \\
                    c & d \\
                    e & f }
    \floatright )
The Tour of WebEQ includes several more
examples of the use of arrays.
Another use of WebTeX arrays besides matrices is the creation of a function defined on two or more domains. Here we use a 2x3 array to define the absolute value function:
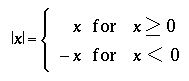
|x| = \left \{
          \array{ \arrayopts{\collayout{right center left}}
                  x & \text{ for } & x \geq 0 \\
                 -x & \text{ for } & x \lt 0 }
      \right
The x's in the first and third columns are lined up using
the \collayout array option. The \text
commands in the center column ensure that the word `for' is in a roman
font.
Also notice that there is no right delimiter, even though
the \right command is required.
Arrays can also be used to create commutative diagrams.
Some overlap commands may be needed to help set the function names at
the correct location relative to the arrows. These commands are
\llap{} (Argument is left of center),
\rlap{} (Argument is right of center),
\ulap{} (Argument is above center), and
\dlap{} (Argument is below center).
A letter g may be placed above an arrow

X \overset{\ulap{g}}{\longrightarrow} Y
\overset puts the letter above the arrow.
Using \ulap gives the effect that the center of the g /
arrow combination is aligned with the arrow itself. If we did not use
it, the whole structure would be centered, leaving the arrow too low.
To create a square commutative diagram, we use this as the first row of a 3x3 array, placing a & between the letters and the arrow.
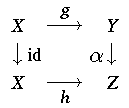
\array{
   \rowopts{\align{center}}
   X &            \overset{\ulap{g}}{\longrightarrow}    & Y \\
   \downarrow \rlap{\mathop{id}} &         & \llap{\alpha}{\downarrow} \\
   \rowopts{\align{center}}
   X &            \underset{\dlap{h}}{\longrightarrow}   & Z
   }
The tour of WebEQ includes an example of a commutative diagram.
![[HOME]](/pix/home.gif) The Geometry Center Home Page
The Geometry Center Home PageCopyright © 1996-1997 by The Geometry Center. All rights reserved.